

Using Lumens documents have some steps that you need to follow to get actual performance. Basically, a new user doesn’t know how to use the Lumens document camera in the right way. This article will show you the real ways of using this Lumens camera and let you know essential information too.
First of all, you want to know the parts of the camera so you may use it knowing every part’s usage.
- Autofocus
- Gooseneck
- Lamp
- Control panel
- Built-in microphone
- LED indicator
- Remote sensor
- Lens
- LED lamp
- DIP switching setting
- Button

All the mentioned parts have individual activities and all of them are very important to get peak performance. Let’s know the using procedure.
Step 1: Installation and setup
Initially, you require to set up the DIP switch setting. This is the main task before going to the next step.
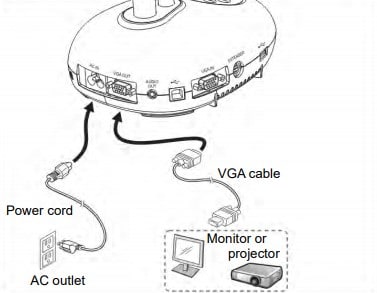
Step 2: Connecting to a projector and monitor
In this step, connect the camera with electricity using the given power cord. The source of electricity should be (AC). Next, connect the camera with the computer or projector with the VGA cable.
There are several ways to install different types of devices.
- You may connect HDTV with the camera using an HDMI cable.
- Connecting to a computer using Lumens software. The software is available on the Lumens website.
- Connecting to a computer, monitor, or projector together.
- Connecting to a computer and USB disk together.
- Connecting to an Interactive Whiteboard (IWB)
- Connecting to a computer with RS232
- Connecting to a TV
- Full connectivity including USB
Step 3: Install application software
Installing the software lets a user control the device conveniently, record and capture images, annotate images, support full-screen function, highlight the important device, and save it.
Step 5: Go for using

- Keep an object under the camera to be captured.
- Turn on the power.
- Adjust or aim the gooseneck and lens to the correct position so the lens can capture the placed object.
- Now press the autotune button to optimize the image.
- Well done, you are ready to start teaching or making a presentation.
- When the camera’s head moved, locate it again and press the button to refocus the lens.
Purposes of Each Button
- On/off button: It let you turn on and off the Lumens camera. Press and hold for 5-10 seconds to turn off.
- Arrow option: Use to move up, down. Left and right for selecting the object.
- Focus: To do the autofocus.
- Autotune: This is for adjusting with the best brightness mode and focusing performance.
- BRT +/-: Let you adjust the brightness
- Capture: Use for capturing the image to the internal disc or USB disk.
- Capture/del: Use for deleting captured images from the internal disk or USB disk.
- Enter: Activate or enter function.
- Enter/freeze: Freeze the live image and OSD mode activate/enter function.
- Freeze: It freezes the image to stay on the screen briefly. Press again to defreeze.
- LAMP: LAMP mode for the toggle switch.
- MASK: For activate light/spotlight mode.
- Menu: Activate the setting menu and exit menu.
- Pan: Enable/ disable the fractional enlarged mode.
- PIP: For image comparison between the love and storage images.
- Playback: Read stored files from the internal disk or USB disk.
- Record: it records the moving image to the internal/USB disk. Press
- Again to stop recording.
- Rotate Fir screen rotation 0 to 180-degree flip/mirror.
- Zoom: Increase and decrease image sizes.
Safety Instruction
You have to obey the safety rules if you are determined to get a seamless performance.
- Don’t place the camera in the tilted position.
- Don’t keep it in uneven space like a trolley, table, or stand.
- Use the camera far from the water source and heat.
- Use the recommended attachment if necessary.
- Use the suggested power source. If you are not sure which power mode is needed, ask the dealer or provider.
- Place the camera where you can unplug it easily and instantly.
- Make sure the plug is dust-free before inserting it into the power socket.
- Connect the power cord tightly to the socket. There should not have losses state.
- Before cleaning the camera disconnect the plug from the power source/unplug it. Use a dried cloth to wipe and clean.
- Keep clean all the connections.
- Don’t place it on the sofa or any soft surfaces.
- Unplug the Document Camera when storm/ thunderstorms.
However, using the document camera is not a big deal as particularly a new use think. In case once you know the using ways and maintain it correctly then this camera will go for a long time with giving a satisfying performance.
Check Lumens Documents Cameras:
Leave a Reply